|
From the Home Page of the ACT, click on the left link "Experiments"
to view the list of remote processes availables for control. For each process it
is provided a "System Description" link in which a mathematical
model of the process is given. This model can be useful to better understand how
the process works, and to allow a user to design a control law.
The Automatic Control Telelab allows a user to execute 3 kinds of remote
experiments:
Control Experiment using a Predefined
Controller
Once chosen the remote process on which perform the experiment, click on "Control
Experiment"; a new page (Control Type Interface) will be loaded (see Figure 1).
Control Type Interface

Figure 1 - The Control Type Interface
Now it is requested to fill a form
regarding some personal data (Name, Country and Email address). This data
will be used for statistical purpose.
Under the personal data panel, one or more predefined
controllers are displayed. The Simulink models representing such
controllers can be downloaded by the "Download Model"
link.
To run the experiment using a predefined controller
just click on "Run Experiment". A new interface (Experiment
Interface) will
appear (Figure 2).
Experiment Interface
This interface is divided in 5 parts:
(1) Command Panel
(2) Controller Parameters Panel
(3) Reference Panel
(4) Experiment Dynamics Window
(5) Live Video Window
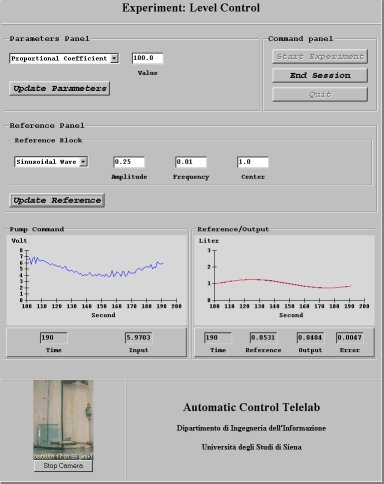
Figure 2 - The Experiment Interface
(1) Command Panel: This panel contains only 3 buttons which allow to start the
experiment, to stop it or to quit (before running the experiment).
(2) Controller Parameter Panel: In this panel, the typical parameters of the controller
are displayed. The user can modify them and send the new values to the server just
pressing the " update parameters" button.
(3) Reference Panel: This section gives the user the opportunity to choose the reference
signal among a set of possible choices.
(4) Experiment Dynamics Window: To monitor the dynamics of the process,
some graphical and numerical panels are provided. The number of these panels will change
with the number of inputs and outputs of the process. For a SISO process (like in Fig. 2) there is a panel for the input
(command) and a panel for the reference and the output. These graphics are updated every second.
(5) Live Video Window: In this part, a live video of the experiment is
shown.
Once stopped the experiment (by the user, the time-out or the safety system),
the user can download the file containing the detailed dynamics of the experiment in Matlab format (.mat). This information can be useful for
off-line analysis.
Control Experiment using a User-defined
Controller
Once chosen the remote process on which perform the
experiment, click on "Control
Experiment"; a new page (Control Type Interface) will be loaded (see Figure 1).
The only difference with respect to the predefined
controller is that now, to run an experiment, it is needed to upload to the
server a Simulink model which implements the user controller.
To know how to design a controller click
here.
In the Control Type Interface (Fig. 1) it is needed to
fill the field "Controller Model" choosing the Simulink model
file (.mdl) of the controller. If such controller needs some workspace variables
to work, it is possible to set the Matlab Workspace file in the "Controller
Data" field.
Then it is required to set the sample time to be used. If the controller is continuous time, sample time is intended as the
integration step of the Simulink solver.
From this interface it is also possible to download a
Simulink model which describe the selected process. So it is possible to
simulate the controller behaviour before using it on the real experiment.
It is now possible to send the controller to the server by
means of the "Send Controller" link. The controller is
then compiled and if no errors occur, the "Experiment Interface"
is displayed (Fig. 2). Then the experiment follows the steps described
previously.
Student Competition Experiment
Student Competition differs from the control experiment
descrived above, since now it is required that a user-defined controller must
satisfy certain performance specifications. Controllers are then evaluated and
ranked.
To access to the competition, from the "Experiment
page" (or the shortcut "Competitions" in the left frame), just
click on the "Student Competition" link (note that not all
processes have this link). It now possible to see all the competitions about the
chosen process. For each competition it is possible to view a brief description
as well as a complete description (pdf file) of the competition.
Through the "Show Ranking" link it is
possible to view all the controllers regarding that competition. For each
controller it is then possible to see some general data and a time plot of the
experiment. Moreover it is possible to download your own controllers.
To partecipate to the competition just click on "Try a
Controller". Then it is needed to login, since only registered users can
compete. For new users, a special form regarding personal data is provided.
Once logged in, the Interface shows in Figure 3 appears. This
Interface is similar to that described in Figure 1, but here it is required also
to give a name and a description at your controller. Rules about how to write a
controller are the same as for user-defined controllers (how to design a
controller).
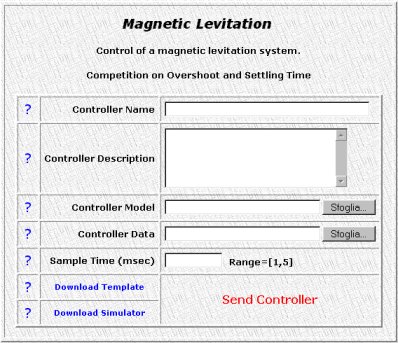
Figure 3 - The Competition Interface
Also in this case it is possible to download a
"Simulator", to test the controller before using it on the actual
plant.
Once sent the controller ("Send Controller"),
if everything is ok, an interface similar to that shown in Figure 2 appears, but
without the Controller Parameter Panel and the Reference Panel. In fact, it is
not allowed to change anything during the competition experiment. To run the
competition just press the "Start Experiment" button.
At the end of the competition the experiment is automatically
stopped, and the performance indexes computed. If such indexes are satisfy, an
overall index is computed and the controller put in the ranking.
If during the experiment the system becomes unstable, it is
automatically stopped and no index is computed.
There is a maximum number of controllers that each user can
do; over that bound it is requested to delete one.
How to design a controller model
Software requirements:
Matlab 5.0 (or higher) and Simulink.
How to Design a Controller:
Design a Simulink model of your controller according to limitations described below. For the user convenience, a template model can be downloaded from the server.
This Simulink model contains two subsystems (only one for Student Competition
Template), which refer to the controller and the reference as well. You have just to connect the input and output blocks contained in it with the blocks which implement the controller.
To insert an on-line tuning parameter (not allowed for Student Competition), you must label a block in this way:
ACT_TP_parameter name (E.g. ACT_TP_Proportional Coefficient)
In this case, you will be able to modify the parameter while the experiment is running. You can do this only for constant blocks and gain blocks. Any other block
may not be recognized properly.
Limitations:
To design a Simulink controller model you cannot use Simulink blocks containing Matlab functions and S-functions.
| 


